JLabel and
JButton, can be decorated with an icon -- a fixed-sized
picture. An icon is an object that adheres to the IconIcon
interface: ImageIconSome Swing components, such as JLabel and
JButton, can be decorated with an icon -- a fixed-sized
picture. An icon is an object that adheres to the Icon![]() interface. Swing
provides a particularly useful implementation of the
interface. Swing
provides a particularly useful implementation of the Icon
interface: ImageIcon![]() , which paints an
icon from a GIF or JPEG image.
, which paints an
icon from a GIF or JPEG image.
Here's a snapshot of an application that decorates two labels with an icon:
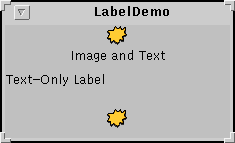
ImageIcon icon = new ImageIcon("images/middle.gif",
                               "a pretty but meaningless splat");
...
label1 = new JLabel("Image and Text", icon, JLabel.CENTER);
...
label3 = new JLabel(icon);
ImageIcon
constructor specifies the file to load, relative to the directory containing
the application's class file. The second argument provides a description of
the icon, to be used by assistive
technologies. This description might be used, for example, to help a
visually impaired user understand what information the icon conveys.
Applets generally load image data from the computer that served up the applet. There are two reasons for this. First, untrusted applets can't read from the file system on which they're running. Second, it just makes sense to put an applet's class and data files together on the server. To load image data from the server, an applet uses a URL as shown in the following example:
public class SomeClass extends JApplet ... {
    protected String leftButtonFilename = "images/left.gif";
    ...
    public void init() {
        ...
        URL leftButtonURL = getURL(leftButtonFilename);
        ...
        leftButtonIcon = new ImageIcon(leftButtonURL,
                                       "an arrow pointing left");
        ...
    }
    ...
    protected URL getURL(String filename) {
        URL codeBase = getCodeBase();
        URL url = null;

        try {
            url = new URL(codeBase, filename);
        } catch (java.net.MalformedURLException e) {
            System.err.println("Couldn't create image: " +
                               "badly specified URL");
            return null;
        }

        return url;
    }
    ...
}
getURL method for use in your applet. For more information on
specifying the source of image data, see Specifying
the Image Source.
When you specify a filename or URL to an ImageIcon
constructor, the constructor returns only after the image data is completely
loaded. Thus, you can be sure that the image icon is usable following the call
to the constructor. If you want more information while the image is loading,
you can register an observer on an image icon by calling its
setImageObserver method.
Under the covers, each image icon uses an Image![]() object to hold
the image data and a
object to hold
the image data and a MediaTracker![]() object, which is
shared by all image icons in the same program, to keep track of the image's
loading status. If you're curious about
object, which is
shared by all image icons in the same program, to keep track of the image's
loading status. If you're curious about Image objects, image
observers, media trackers, and other image topics, see Using Images![]() .
.
The rest of this section covers the following topics:
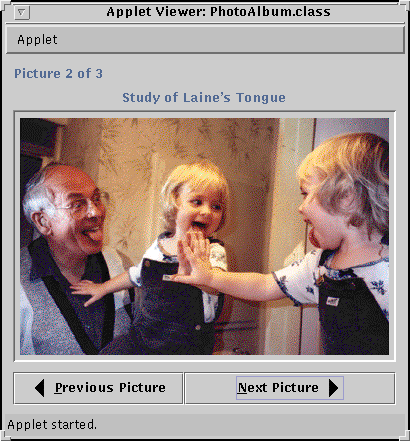
Here's an applet that uses eight image icons. In the snapshot, you can see three of them: one displays the photograph and two decorate the buttons at the bottom of the applet window with small arrows.
Try this:
- Run the applet. For information on running applets, see Running Swing Applets.
The main source code for the program isIconDemoApplet.java. You will also need a few other source files and several image files. See the examples index for links to all the files required by this example.
- Click the Previous Picture and Next Picture buttons to view the photographs.
- Hold the mouse over a photograph. A tool tip appears that indicates the filename of the current photograph and its width and height.
- To view your own photographs, modify the applet parameters. Here's the applet tag used for the applet running above:
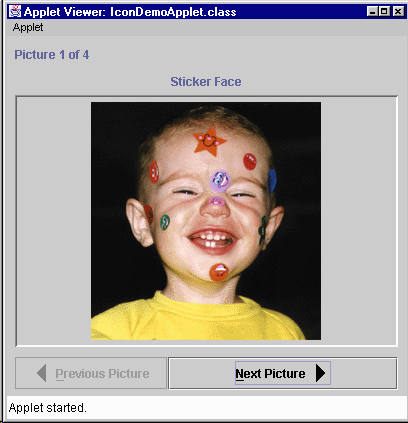
<applet code="IconDemoApplet.class" codebase="example-swing/" archive="icon.jar" width="400" height="360"> <param NAME="IMAGEDIR" VALUE="images"> <param NAME="IMAGE0" VALUE="stickerface.gif"> <param NAME="CAPTION0" VALUE="Sticker Face"> <param NAME="WIDTH0" VALUE="230"> <param NAME="HEIGHT0" VALUE="238"> ... <applet>TheIMAGEDIRparameter indicates that the image files should be in a directory namedimagesrelative to the applet's codebase. Four parameters are required for each photograph and the applet uses four photographs. The tag shown above shows the parameters for only the first photograph.
Most often, an image icon's data comes from an image file. You can specify
the location of the file with either a filename or a URL![]() object. For
applications, the filename or URL is generally relative either to the
directory containing the application's class files, or to the class path.
Applets generally use a URL that is constructed relative to the applet's code
base (the directory containing the applet's class files).
object. For
applications, the filename or URL is generally relative either to the
directory containing the application's class files, or to the class path.
Applets generally use a URL that is constructed relative to the applet's code
base (the directory containing the applet's class files).
You've already seen how to specify a filename relative to the directory
containing the application's class files. To specify a URL relative to an
application's class path, you can use the ClassLoader![]()
getSystemResource method. Here is an example:
ImageIcon icon = null;
URL iconURL = ClassLoader.getSystemResource("images/middle.gif");
if (iconURL != null) {
    icon = new ImageIcon(iconURL,
                         "a beautiful yet meaningless icon");
}
getSystemResource method looks through the
directories and JAR files in the program's class path, returning a URL as soon
as it finds the desired file. For example, assume that you put a JAR file
named icons.jar in your program's class path. If the JAR file
contains images/middle.gif, then the class loader will definitely
return a URL for images/middle.gif. However, the URL might not be
relative to icons.jar, if another JAR file or directory in the
class path contains images/middle.gif. The URL will point to the
first JAR file or directory in the class path that contains
images/middle.gif.
The IconDemoApplet program initializes each of its image icons
from GIF files whose locations are specified with URLs. Because
IconDemoApplet is designed to be an untrusted applet, we must
place the image files under the applet's code base. The following figure shows
the locations of files for IconDemoApplet.
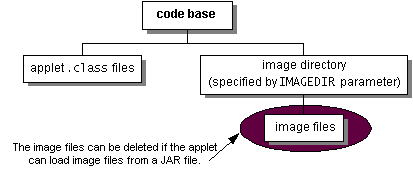
Note: Applets are supposed to be able to load images from JAR files. Currently, however, some browsers can't read images from a JAR file, although they do successfully get classes from a JAR file. With our applets, we currently hedge our bets by both putting the image files in the applet's archive file (the JAR file containing the applet's class files) and by putting the image files in the file system on the server. The figure above depicts our setup.
Because the photograph images are large and because the applet
uses multiple images, IconDemoApplet uses several techniques to
improve the performance of the program as perceived by the user.
imagedir = getParameter("IMAGEDIR");
if (imagedir != null)
    imagedir = imagedir + "/";
...
ImageIcon dimmedNextIcon = new ImageIcon(
    getURL(imagedir + "dimmedRight.gif"));
ImageIcon dimmedPreviousIcon = new ImageIcon(
    getURL(imagedir + "dimmedLeft.gif"));
...
nextButton.setDisabledIcon(dimmedNextIcon);
...
previousButton.setDisabledIcon(dimmedPreviousIcon);
init method.
This applet uses four separate image files just to display arrows on two
buttons. The performance impact of these little images can add up,
especially if the browser in which the applet is running uses a separate
HTTP connection to load each one. A better alternative is to implement a
custom Icon that paints the arrows. See Creating
a Custom Icon Implementation for an example.
Not all programs can benefit from lazy loading. For example, the TumbleItem.java![]() applet performs an animation,
so all of the images are needed up-front. That applet's initialization code
causes the images to be loaded in a background thread, so that the applet
can present a GUI (a "Loading Images..." label) before the images have
loaded.
applet performs an animation,
so all of the images are needed up-front. That applet's initialization code
causes the images to be loaded in a background thread, so that the applet
can present a GUI (a "Loading Images..." label) before the images have
loaded.
SwingWorker
to load each photograph image in a background thread. Because the image is
loaded in a separate thread, the user can still click the buttons and
otherwise interact with the applet while the image is loading.
Here's the code to load each image:
private void loadImage(final String imagePath,
                       final int index) {
    final SwingWorker worker = new SwingWorker() {
        ImageIcon icon = null;

        public Object construct() {
            icon = new ImageIcon(getURL(imagePath));
            return icon;
        }

        public void finished() {
            Photo pic = (Photo)pictures.elementAt(index);
            pic.setIcon(icon);
            if (index == current)
                updatePhotograph(index, pic);
        }
    };
    worker.start();
}
construct method, which creates the
image icon for the photograph, is invoked by the thread that's created by
the SwingWorker constructor and started by the
start method. After the image icon is fully loaded, the
finished method is called. The finished method is
guaranteed to execute on the event-dispatching thread, so it can safely
update the GUI to display the photograph.
photographLabel.setIcon(null);
photographLabel.setText("Loading image...");
If you write a program without caching image icons, it may appear that some implicit image caching is going on within the Java platform. However, this is a side effect of the implementation and is not guaranteed. If your program uses one image many times, you can create the image icon once and use the same instance multiple times.
If you use a simple image repeatedly, consider implementing a
custom Icon class to paint the image. The really nice thing about
a custom icon is that you can easily change the icon's appearance to reflect
its host component's state.
Look-and-feel implementations often use custom icons. For example, the
Metal Look & Feel uses a single MetalCheckBoxIcon object to
paint all of the check boxes in the GUI. The MetalCheckBoxIcon
paints itself differently depending on whether its host component is enabled,
pressed, or selected.
In this section, we'll convert a program called ButtonDemo so
that it uses a custom icon to paint these two arrows:
You can see a picture of
ButtonDemo in How to Use the Common Button APIButtonDemo.javaButtonDemo uses
the following code to load the arrows from GIF files and put the arrows into
buttons:
ImageIcon leftButtonIcon = new ImageIcon("images/right.gif");
...
ImageIcon rightButtonIcon = new ImageIcon("images/left.gif");

b1 = new JButton("Disable middle button", leftButtonIcon);
...
b3 = new JButton("Enable middle button", rightButtonIcon);
ArrowIcon. Only the bold lines have changed. You can find the
entire program in CustomIconDemo.javaIcon leftButtonIcon = new ArrowIcon(SwingConstants.RIGHT);
...
Icon rightButtonIcon = new ArrowIcon(SwingConstants.LEFT);
b1 = new JButton("Disable middle button", leftButtonIcon);
...
b3 = new JButton("Enable middle button", rightButtonIcon);
ArrowIcon.javaclass ArrowIcon implements Icon, SwingConstants {
...
public void paintIcon(Component c, Graphics g,
int x, int y) {
int length = xPoints.length;
int adjustedXPoints[] = new int[length];
int adjustedYPoints[] = new int[length];
for (int i = 0; i < length; i++) {
adjustedXPoints[i] = xPoints[i] + x;
adjustedYPoints[i] = yPoints[i] + y;
}
if (c.isEnabled()) {
g.setColor(Color.black);
} else {
g.setColor(Color.gray);
}
g.fillPolygon(adjustedXPoints, adjustedYPoints,
length);
}
}
fillPolygon
method is discussed in Painting ShapesUsing a custom icon to paint the arrows has a few implications:
ImageIcon icon for a button, the
button doesn't bother to calculate the dimmed (disabled) version of the
icon. Instead, the button lets the icon paint its disabled self. This can
reduce computation time and save space that would otherwise be used to hold
the dimmed image.
ArrowIcon). The performance implications of this depend on
factors such as the platform, the size of the files, and the overhead for
loading each type of file. The following tables list the commonly used ImageIcon
constructors and methods. Note that ImageIcon is not a descendent
of JComponent or even of Component.
The API for using image icons falls into these categories:
| Method or Constructor | Purpose |
|---|---|
ImageIcon() |
Create a ImageIcon instance, initializing it to contain
the specified image. The first argument indicates the source -- image,
byte array, filename, or URL -- from which the image icon's image should
be loaded. The source must be in a format supported by the
java.awt.Image class: namely GIF or JPEG. The second
argument, when present, provides a description for the image. The
description is a short textual description of the image that could be
used in a variety of ways, such as alternate text for the image. |
void setImage(Image) |
Set or get the image displayed by the image icon. |
void paintIcon(Component, Graphics, int,
int) |
Paint the image icon's image in the specified graphics context. You
would do this only if you're implementing a custom component that
performs its own painting. The Component object is used as
an image observer. You can rely on the default behavior provided by
Component class and pass in any component. The two
int argments specify the x and y coordinates,
respectively. |
| Method | Purpose |
|---|---|
void setDescription(String) |
Set or get a description of the image. This description is intended for use by assistive technologies. |
int getIconWidth() |
Get the width or height of the image icon in pixels. |
| Method | Purpose |
|---|---|
void setImageObserver(ImageObserver)
|
Set or get an image observer for the image icon. |
int getImageLoadStatus() |
Get the loading status of the image icon's image. The set of values
returned by this method are defined by
MediaTracker. |
import javax.swing.*;
import java.awt.*;
import java.awt.event.*;
import java.net.URL;
import java.util.Vector;
import java.util.StringTokenizer;

public class IconDemoApplet extends JApplet
                            implements ActionListener {
    Vector pictures;

    JButton previousButton;
    JButton nextButton;
    JLabel photographLabel;
    JLabel captionLabel;
    JLabel numberLabel;

    int current = 0;
    int widthOfWidest = 0;
    int heightOfTallest = 0;

    String imagedir = null;

    public void init() {
        //Parse the applet parameters
        pictures = parseParameters();

        //If the applet tag doesn't provide an "IMAGE0" parameter,
        //display an error message.
        if (pictures.size() == 0) {
            captionLabel = new JLabel("No images listed in applet tag.");
            captionLabel.setHorizontalAlignment(JLabel.CENTER);
            getContentPane().add(captionLabel);
            return;
        }

        //NOW CREATE THE GUI COMPONENTS

        //A label to identify XX of XX.
        numberLabel = new JLabel("Picture " + (current+1) +
                                 " of " + pictures.size());
        numberLabel.setHorizontalAlignment(JLabel.LEFT);
        numberLabel.setBorder(BorderFactory.createEmptyBorder(5, 0, 5, 5));

        //A label for the caption.
        final Photo first = (Photo)pictures.firstElement();
        captionLabel = new JLabel(first.caption);
        captionLabel.setHorizontalAlignment(JLabel.CENTER);
        captionLabel.setBorder(BorderFactory.createEmptyBorder(5, 0, 5, 0));

        //A label for displaying the photographs.
        photographLabel = new JLabel("Loading first image...");
        photographLabel.setHorizontalAlignment(JLabel.CENTER);
        photographLabel.setVerticalAlignment(JLabel.CENTER);
        photographLabel.setVerticalTextPosition(JLabel.CENTER);
        photographLabel.setHorizontalTextPosition(JLabel.CENTER);
        photographLabel.setBorder(BorderFactory.createCompoundBorder(
                        BorderFactory.createLoweredBevelBorder(),
                        BorderFactory.createEmptyBorder(5, 5, 5, 5)
        ));
        photographLabel.setBorder(BorderFactory.createCompoundBorder(
                        BorderFactory.createEmptyBorder(0, 0, 10, 0),
                        photographLabel.getBorder()
        ));

        //Set the preferred size for the picture,
        //with room for the borders.
        Insets i = photographLabel.getInsets();
        photographLabel.setPreferredSize(new Dimension(
                            widthOfWidest+i.left+i.right,
                            heightOfTallest+i.bottom+i.top));

        //Create the next and previous buttons.
        ImageIcon nextIcon = new ImageIcon(
                getURL(imagedir + "right.gif"));
        ImageIcon dimmedNextIcon = new ImageIcon(
                getURL(imagedir + "dimmedRight.gif"));
        ImageIcon previousIcon = new ImageIcon(
                getURL(imagedir + "left.gif"));
        ImageIcon dimmedPreviousIcon = new ImageIcon(
                getURL(imagedir + "dimmedLeft.gif"));

        previousButton = new JButton("Previous Picture",
                                     previousIcon);
        previousButton.setDisabledIcon(dimmedPreviousIcon);
        previousButton.setVerticalTextPosition(AbstractButton.CENTER);
        previousButton.setHorizontalTextPosition(AbstractButton.RIGHT);
        previousButton.setMnemonic(KeyEvent.VK_P);
        previousButton.setActionCommand("previous");
        previousButton.addActionListener(this);
        previousButton.setEnabled(false);

        nextButton = new JButton("Next Picture", nextIcon);
        nextButton.setDisabledIcon(dimmedNextIcon);
        nextButton.setVerticalTextPosition(AbstractButton.CENTER);
        nextButton.setHorizontalTextPosition(AbstractButton.LEFT);
        nextButton.setMnemonic(KeyEvent.VK_N);
        nextButton.setActionCommand("next");
        nextButton.addActionListener(this);

        //Lay out the GUI.
        GridBagLayout layout = new GridBagLayout();
        GridBagConstraints c = new GridBagConstraints();

        Container contentPane = getContentPane();
        contentPane.setLayout(layout);

        c.gridwidth = GridBagConstraints.REMAINDER;
        c.fill = GridBagConstraints.HORIZONTAL;
        layout.setConstraints(numberLabel, c);
        contentPane.add(numberLabel);

        layout.setConstraints(captionLabel, c);
        contentPane.add(captionLabel);

        c.gridwidth = GridBagConstraints.REMAINDER;
        c.fill = GridBagConstraints.BOTH;
        layout.setConstraints(photographLabel, c);
        contentPane.add(photographLabel);

        c.gridwidth = GridBagConstraints.RELATIVE;
        c.fill = GridBagConstraints.HORIZONTAL;
        layout.setConstraints(previousButton, c);
        contentPane.add(previousButton);

        c.gridwidth = GridBagConstraints.REMAINDER;
        layout.setConstraints(nextButton, c);
        contentPane.add(nextButton);

        //Start loading the image for the first photograph now.
        //The loadImage method uses a SwingWorker
        //to load the image in a separate thread.
        loadImage(imagedir + first.filename, current);
    }

    //User clicked either the next or the previous button.
    public void actionPerformed(ActionEvent e) {
        //Show loading message.
        photographLabel.setIcon(null);
        photographLabel.setText("Loading image...");

        //Compute index of photograph to view.
        if (e.getActionCommand().equals("next")) {
            current += 1;
            if (!previousButton.isEnabled())
                previousButton.setEnabled(true);
            if (current == pictures.size() - 1)
                nextButton.setEnabled(false);
        } else {
            current -= 1;
            if (!nextButton.isEnabled())
                nextButton.setEnabled(true);
            if (current == 0)
                previousButton.setEnabled(false);
        }

        //Get the photo object.
        Photo pic = (Photo)pictures.elementAt(current);

        //Update the caption and number labels.
        captionLabel.setText(pic.caption);
        numberLabel.setText("Picture " + (current+1) +
                            " of " + pictures.size());

        //Update the photograph.
        ImageIcon icon = pic.getIcon();
        if (icon == null) {     //haven't viewed this photo before
            loadImage(imagedir + pic.filename, current);
        } else {
            updatePhotograph(current, pic);
        }
    }

    //Must be invoked from the event-dispatching thread.
    private void updatePhotograph(int index, Photo pic) {
        ImageIcon icon = pic.getIcon();

        photographLabel.setToolTipText(pic.filename + ": " +
                                       icon.getIconWidth() + " X " +
                                       icon.getIconHeight());
        photographLabel.setIcon(icon);
        photographLabel.setText("");
    }

    //Load an image in a separate thread.
    private void loadImage(final String imagePath, final int index) {
        final SwingWorker worker = new SwingWorker() {
            ImageIcon icon = null;

            public Object construct() {
                icon = new ImageIcon(getURL(imagePath));
                return icon; //return value not used by this program
            }

            //Runs on the event-dispatching thread.
            public void finished() {
                Photo pic = (Photo)pictures.elementAt(index);
                pic.setIcon(icon);
                if (index == current)
                    updatePhotograph(index, pic);
            }
        };
	worker.start();
    }

    protected URL getURL(String filename) {
        URL codeBase = this.getCodeBase();
        URL url = null;

        try {
            url = new URL(codeBase, filename);
        } catch (java.net.MalformedURLException e) {
            System.out.println("Couldn't create image: "
                             + "badly specified URL");
            return null;
        }

        return url;
    }

    protected Vector parseParameters() {
        Vector pix = new Vector(10);    //start with 10, grows if necessary
        int i = 0;                      //parameters index must start at 0
        String paramName = "IMAGE" + i;
        String paramValue;

        while ((paramValue = getParameter(paramName)) != null) {
            Photo pic = new Photo(paramValue, getCaption(i),
                                  getWidth(i), getHeight(i));
            pix.addElement(pic);
            i++;
            paramName = "IMAGE" + i;
        }

        //Get the name of the directory that contains the image files.
        imagedir = getParameter("IMAGEDIR");
        if (imagedir != null)
            imagedir = imagedir + "/";

        return pix;
    }

    protected String getCaption(int i) {
        return getParameter("CAPTION"+i);
    }

    protected int getWidth(int i) {
        int width = 0;
        String widthString = getParameter("WIDTH"+i);
        if (widthString != null) {
            try {
                width = Integer.parseInt(widthString);
            } catch (NumberFormatException e) {
                width = 0;
            }
        } else {
            width = 0;
        }
        if (width > widthOfWidest)
            widthOfWidest = width;
        return width;
    }

    protected int getHeight(int i) {
        int height = 0;
        String heightString = getParameter("HEIGHT"+i);
        if (heightString != null) {
            try {
                height = Integer.parseInt(heightString);
            } catch (NumberFormatException e) {
                height = 0;
            }
        } else {
            height = 0;
        }
        if (height > heightOfTallest)
            heightOfTallest = height;
        return height;
    }

    public String[][] getParameterInfo() {
        String[][] info = {
            {"IMAGEDIR", "string", "directory containing image files" },
            {"IMAGEN", "string", "filename" },
            {"CAPTIONN", "string", "caption" },
            {"WIDTHN", "integer", "width of image" },
            {"HEIGHTN", "integer", "height of image" },
        };
        return info;
    }
}
Uses a custom icon class implemented by ArrowIcon.java

import java.awt.*;
import java.awt.event.*;
import javax.swing.*;

public class CustomIconDemo extends JPanel
                            implements ActionListener {
    protected JButton b1, b2, b3;

    public CustomIconDemo() {
        Icon leftButtonIcon = new ArrowIcon(SwingConstants.RIGHT);
        Icon middleButtonIcon = new ImageIcon("images/middle.gif");
        Icon rightButtonIcon = new ArrowIcon(SwingConstants.LEFT);

        b1 = new JButton("Disable middle button", leftButtonIcon);
        b1.setVerticalTextPosition(AbstractButton.CENTER);
        b1.setHorizontalTextPosition(AbstractButton.LEFT);
        b1.setMnemonic(KeyEvent.VK_D);
        b1.setActionCommand("disable");

        b2 = new JButton("Middle button", middleButtonIcon);
        b2.setVerticalTextPosition(AbstractButton.BOTTOM);
        b2.setHorizontalTextPosition(AbstractButton.CENTER);
        b2.setMnemonic(KeyEvent.VK_M);

        b3 = new JButton("Enable middle button", rightButtonIcon);
        //Use the default text position of CENTER, RIGHT.
        b3.setMnemonic(KeyEvent.VK_E);
        b3.setActionCommand("enable");
        b3.setEnabled(false);

        //Listen for actions on buttons 1 and 3.
        b1.addActionListener(this);
        b3.addActionListener(this);

        b1.setToolTipText("Click this button to disable the middle button.");
        b2.setToolTipText("This middle button does nothing when you click it.");
        b3.setToolTipText("Click this button to enable the middle button.");

        //Add Components to this container, using the default FlowLayout.
        add(b1);
        add(b2);
        add(b3);
    }

    public void actionPerformed(ActionEvent e) {
        if (e.getActionCommand().equals("disable")) {
            b2.setEnabled(false);
            b1.setEnabled(false);
            b3.setEnabled(true);
        } else {
            b2.setEnabled(true);
            b1.setEnabled(true);
            b3.setEnabled(false);
        }
    }

    public static void main(String[] args) {
        JFrame frame = new JFrame("CustomIconDemo");
        frame.addWindowListener(new WindowAdapter() {
            public void windowClosing(WindowEvent e) {
                System.exit(0);
            }
        });

        frame.getContentPane().add(new CustomIconDemo(),
                                   BorderLayout.CENTER);
        frame.pack();
        frame.setVisible(true);
    }
}
import java.awt.*;
import javax.swing.*;

public class ArrowIcon implements Icon, SwingConstants {
    private int width = 9;
    private int height = 18;

    private int[] xPoints = new int[4];
    private int[] yPoints = new int[4];

    public ArrowIcon(int direction) {
        if (direction == LEFT) {
            xPoints[0] = width;
            yPoints[0] = -1;
            xPoints[1] = width;
            yPoints[1] = height;
            xPoints[2] = 0;
            yPoints[2] = height/2;
            xPoints[3] = 0;
            yPoints[3] = height/2 - 1;
        } else /* direction == RIGHT */ {
            xPoints[0] = 0;
            yPoints[0] = -1;
            xPoints[1] = 0;
            yPoints[1] = height;
            xPoints[2] = width;
            yPoints[2] = height/2;
            xPoints[3] = width;
            yPoints[3] = height/2 - 1;
        }
    }

    public int getIconHeight() {
        return height;
    }

    public int getIconWidth() {
        return width;
    }

    public void paintIcon(Component c, Graphics g, int x, int y) {
        int length = xPoints.length;
        int adjustedXPoints[] = new int[length];
        int adjustedYPoints[] = new int[length];

        for (int i = 0; i < length; i++) {
            adjustedXPoints[i] = xPoints[i] + x;
            adjustedYPoints[i] = yPoints[i] + y;
        }

        if (c.isEnabled()) {
            g.setColor(Color.black);
        } else {
            g.setColor(Color.gray);
        }

        g.fillPolygon(adjustedXPoints, adjustedYPoints, length);
    }
}
import javax.swing.ImageIcon;

public class Photo {
    public String filename;
    public String caption;
    public int width;
    public int height;
    public ImageIcon icon;

    public Photo(String filename, String caption, int w, int h) {
        this.filename = filename;
        if (caption == null)
            this.caption = filename;
        else
            this.caption = caption;
        width = w;
        height = h;
        icon = null;
    }

    public void setIcon(ImageIcon i) {
        icon = i;
    }

    public ImageIcon getIcon() {
        return icon;
    }
}
import javax.swing.SwingUtilities;

/**
 * This is the 3rd version of SwingWorker (also known as
 * SwingWorker 3), an abstract class that you subclass to
 * perform GUI-related work in a dedicated thread.  For
 * instructions on using this class, see:
 *
 * http://java.sun.com/docs/books/tutorial/uiswing/misc/threads.html
 *
 * Note that the API changed slightly in the 3rd version:
 * You must now invoke start() on the SwingWorker after
 * creating it.
 */
public abstract class SwingWorker {
    private Object value;  // see getValue(), setValue()
    private Thread thread;

    /**
     * Class to maintain reference to current worker thread
     * under separate synchronization control.
     */
    private static class ThreadVar {
        private Thread thread;
        ThreadVar(Thread t) { thread = t; }
        synchronized Thread get() { return thread; }
        synchronized void clear() { thread = null; }
    }

    private ThreadVar threadVar;

    /**
     * Get the value produced by the worker thread, or null if it
     * hasn't been constructed yet.
     */
    protected synchronized Object getValue() {
        return value;
    }

    /**
     * Set the value produced by worker thread
     */
    private synchronized void setValue(Object x) {
        value = x;
    }

    /**
     * Compute the value to be returned by the get method.
     */
    public abstract Object construct();

    /**
     * Called on the event dispatching thread (not on the worker thread)
     * after the construct method has returned.
     */
    public void finished() {
    }

    /**
     * A new method that interrupts the worker thread.  Call this method
     * to force the worker to stop what it's doing.
     */
    public void interrupt() {
        Thread t = threadVar.get();
        if (t != null) {
            t.interrupt();
        }
        threadVar.clear();
    }

    /**
     * Return the value created by the construct method.
     * Returns null if either the constructing thread or the current
     * thread was interrupted before a value was produced.
     *
     * @return the value created by the construct method
     */
    public Object get() {
        while (true) {
            Thread t = threadVar.get();
            if (t == null) {
                return getValue();
            }
            try {
                t.join();
            }
            catch (InterruptedException e) {
                Thread.currentThread().interrupt(); // propagate
                return null;
            }
        }
    }


    /**
     * Start a thread that will call the construct method
     * and then exit.
     */
    public SwingWorker() {
        final Runnable doFinished = new Runnable() {
           public void run() { finished(); }
        };

        Runnable doConstruct = new Runnable() {
            public void run() {
                try {
                    setValue(construct());
                }
                finally {
                    threadVar.clear();
                }

                SwingUtilities.invokeLater(doFinished);
            }
        };

        Thread t = new Thread(doConstruct);
        threadVar = new ThreadVar(t);
    }

    /**
     * Start the worker thread.
     */
    public void start() {
        Thread t = threadVar.get();
        if (t != null) {
            t.start();
        }
    }
}